
7 Essential Tips for Gorgeous Bird Photography
For wildlife photography enthusiasts, capturing the stunning beauty of birds isn’t just about the right lens or perfect focus – it’s about harnessing the magic of light. Lighting is the soul of the image, transforming a simple snapshot into a breathtaking portrait of nature. Mastering it unlocks the true potential of your avian subjects, revealing intricate feather details, vibrant colors, and evocative moods. Whether you’re in your local park or on dedicated photography holidays, these seven lighting tips will elevate your bird images:
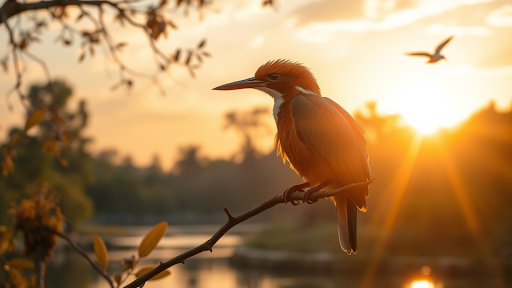
- Embrace the Golden Hours
This is the cardinal rule. The hour after sunrise and the hour before sunset offer the most flattering light for bird photography. The sun is low, casting a warm, golden glow that minimizes harsh shadows and bathes subjects in rich, saturated colors. Feathers shimmer, eyes sparkle, and the overall atmosphere is simply magical. Plan your shoots around these times for consistently beautiful results. It’s the perfect light for photography holidays focused on avian wonders.
2. Seek Soft Overcast Skies
Don’t pack up when clouds roll in! Bright overcast days act like a giant natural softbox. The clouds diffuse the sunlight, eliminating harsh shadows and reducing contrast. This even illumination is fantastic for capturing intricate details in plumage, especially on birds with complex patterns or subtle color variations (think warblers or waterfowl). Colors remain true and vibrant without being blown out.
3. Backlight for Drama & Translucence
Position yourself so the sun is behind your subject. This creates a rim of light around the bird, separating it beautifully from the background. When feathers are thin (like on wings or tail feathers), backlighting can make them glow translucently, revealing incredible textures. It’s perfect for creating silhouettes (see tip 7) or adding a dramatic, ethereal quality. Use spot metering on the bird itself to avoid underexposing your subject.
4. Tame the Midday Sun
Harsh overhead sunlight is notoriously challenging, creating deep, unflattering shadows under wings, beaks, and eyes. If you find yourself shooting midday:
Find Open Shade
Position yourself and your subject so the bird is in the shade, but the background is sunlit. This creates separation and avoids harsh shadows on the bird itself.
Use Fill Flash (Subtly)
A touch of fill flash can lift those deep shadows under the chin or wings. The key is subtlety – aim to fill, not overpower. Use flash exposure compensation (FEC) to dial it down (-1 to -2 stops often works well).
Focus on Details
Harsh light can emphasize textures. Get close for abstract shots focusing on feather patterns, scales on legs, or the structure of the beak.
5. Understand Front vs. Side Lighting
Front Lighting (Sun Behind You)
Provides even illumination, good color saturation, and minimizes shadows. It’s reliable and great for documentary-style shots or when showcasing plumage patterns clearly. However, it can sometimes lack depth and drama.
Side Lighting (Sun 90 Degrees to Subject)
Creates strong shadows that reveal texture, depth, and form. It sculpts the bird, making feathers look three-dimensional. Ideal for emphasizing shape and adding mood. Be mindful of shadow placement – sometimes it works brilliantly, other times it can obscure important features.
6. Chase the Glow
Iridescence & Specular Highlights
Some birds (hummingbirds, grackles, starlings) possess iridescent feathers that shift color depending on the angle of light. To capture this magic, you need direct sunlight hitting the feathers at the precise angle that reveals the vibrant blues, greens, or purples. Be patient, move subtly, and watch for that sudden burst of electric color. Similarly, watch for specular highlights – bright spots of light reflecting off wet feathers (after rain or bathing) or eyes – adding life and sparkle.
7. Experiment with Silhouettes
When the light is low (golden hour or just after sunset), position yourself so the bird is against a bright, colorful sky or water. Expose for the bright background, turning the bird into a striking, recognizable black shape. This emphasizes form, posture, and habitat, creating powerful, minimalist compositions. Look for birds with distinct profiles like herons, eagles, or cranes.
Mastering bird photography lighting is a journey of observation and practice. Learn to read the light, anticipate its effects on your feathered subjects, and position yourself accordingly. By applying these tips, you’ll consistently capture images that showcase not just the bird, but the beautiful, transformative power of light itself – making every outing, especially those dream photography holidays, a truly rewarding visual adventure. Now grab your gear, chase the light, and let the birds shine!
For more information visit us : thebizmagazine.com